PMMA/PMGI Bilayer E-Beam Liftoff Process
Reliable, repeatable liftoff processing in a planetary-type evaporation system like the ones in the NFC requires the ability to generate a re-entrant resist profile at the edges of your features. When doing e-beam lithography at lower voltages (such as the 10-30 KeV? operating range of the old Raith tool), forward scattering as the beam travels through the resist layer will generally create a usable undercut profile without any additional work. At the energies the new Vistec system operates at (100 KeV?), however, forward scattering is minimized to the point where it cannot be relied on to produce a re-entrant profile. In this case, the best solution is to use a bilayer process consisting of a thin imaging layer on top of a thick support/undercut layer.
In this particular process, the imaging resist is PMMA and the support-layer resist is PMGI. The process outlined below is very customizable, and can reliably yield lifted-off features at approximately the resolution of the PMMA imaging layer (10-20 nm). The steps here have been kept very general in order to make the instructions as versatile as possible; for specific questions on any part of the process, contact Bryan Cord.
Obligatory Disclaimer
Process outlines are just that; they are not guaranteed to work perfectly for your specific application and aren’t intended to provide anything more than a useful starting point for engineering your own process. The authors and the MNC in general make no guarantee of anything useful happening if you blindly follow these steps.
Process Flow
- Clean the surface of your sample thoroughly with acetone, methanol, and isopropanol, or other compatible solvents
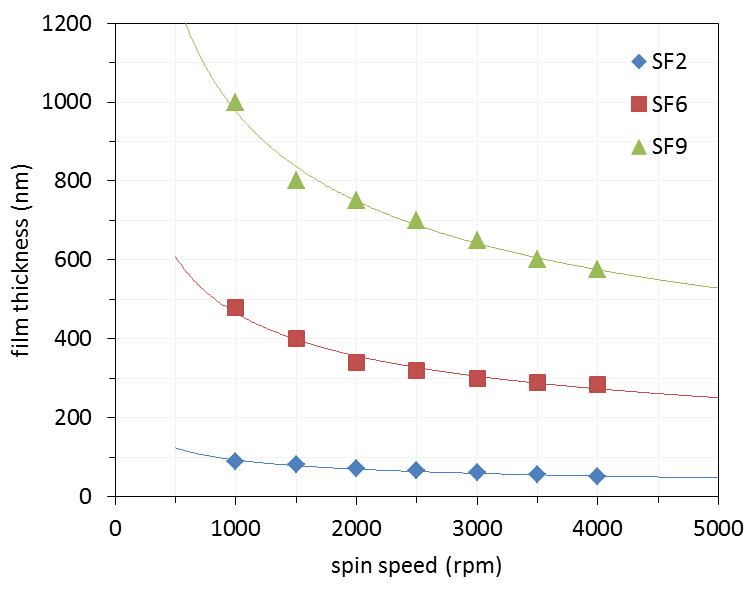
- Spin on PMGI at a thickness of ~3X the metal layer you want to deposit. See the spin curves below for help choosing a concentration and spin speed.
- Bake PMGI on a hot plate at a temperature of 250-275°C for 10-15 minutes.
- Use a nitrogen gun to blow off any particles that may have settled on the surface of the PMGI during baking
- Spin PMMA to a thickness of at least 50 nm on top of the PMGI. Thinner PMMA will give higher resolution while thicker PMMA will make the pattern more durable during development and evaporation. For straight-down liftoff processing, a thickness of 50-100 nm is generally enough. See the PMMA datasheet for spin data.
- Bake the PMMA layer at 180°C for 5-10 minutes (C-series PMMA) or 10-15 minutes (A-series PMMA). The solvent in the A-series resist is less volatile and takes longer to bake out.
- Expose your pattern. Dose levels for the bilayer will be exactly the same as the ones you’d use for a single-layer PMMA exposure. Doses are very geometry-dependent, but for larger features 1000 μC/cm2 is a good starting point with PMMA at 100 KeV?.
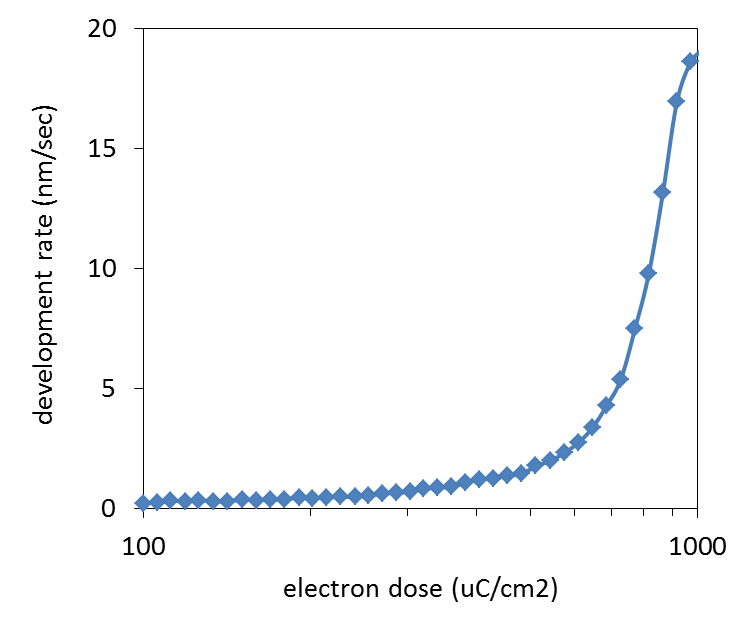
- Develop the PMMA layer. If using the recommended developer (a 3:1 IPA:MIBK solution), a dose of 1000 μC/cm2 will give you a development rate of 10-20 nm/sec, depending on feature geometry (see contrast data below). For a 50-100 nm thick PMMA film, a 30-45 second develop is generally more than enough to clear this dose.
- After rinsing the PMMA developer off the sample with IPA and drying it thoroughly, develop the PMGI layer in a solution of 60% CD-26 developer (dilute with DI water). The approximate undercut-development time of the PMGI layer in this developer is 0.5 nm/sec, although this can vary significantly with geometry. To ensure that your pattern is undercut enough to lift off cleanly, a development time of four minutes is recommended, although for very closely-spaced features this may need to be lowered to avoid developing out all the PMGI between adjacent features. Always develop the PMGI for a minimum of one minute to ensure that the area under the exposed PMMA is fully cleared.
If fine control of undercut length is needed, see B. Cord, C. Dames, and K.K. Berggren, J Vac Sci Technol B 24(6) p. 3139 (2006) for an alternate, more reproducible method of defining undercuts.
- In certain cases, PMGI may leave residue on the surface of your substrate after developing away, which can greatly reduce liftoff yields. If you run into this problem, a very short (several seconds) oxygen-plasma etch in either the RIE or asher prior to evaporation will fix it. Note that in most cases it will also slightly enlarge all your features, so skip this step unless you’re having serious issues with clean liftoff.
- Evaporate the material of your choice onto your sample, making sure to keep the total material thickness to less than 1/3 of the PMGI layer thickness.
- After evaporation, the PMMA/PMGI bilayer can be lifted off using n-methyl-2-pyrrolidone (NMP), which is also known by the trade name PG Remover. Place a small amount of NMP in a glass dish or beaker and heat it on a hot plate set to 80 to 90 C under a fume hood (a 80-90 C hot plate temperature should give you an actual liquid temperature of ~ 60 C, which is optimal). Make sure to cover the NMP container with a non-airtight cover (such as an evaporating dish or petri dish) to minimize vapor escape.
Troubleshooting
- Few or no features present after liftoff: This is probably caused by residual PMGI on your substrate. See step 10 above for instructions on how to remove it prior to evaporation.
- Difficult liftoff/ragged feature edges: This is almost always caused by sidewall deposition during liftoff. Increase the develop time of the PMGI layer to get a more re-entrant resist profile to avoid this.
- Distorted patterns after liftoff/difficult liftoff: This can be caused by the PMMA layer collapsing due to the PMGI layer being entirely developed out from underneath large sections of it. Reduce the PMGI development time if this occurs.