Vistec EBPG5000 Troubleshooting

General Troubleshooting

This table lists solutions to some common, easily-solved problems you may run into during a write.

Problem Solution
Stage locked errors when trying to load/unload or move the stage Unlock the stage using the command unlock. If that fails, try pg_restart
Can’t calculate substrate error when starting an aligned write Double-check that you’re putting your global alignment marks in the command line in the same order that they’re defined in CJOB. They need to be listed left to right.
Too many/too few arguments in command line error when trying to start write Make sure each coordinate in the command line is an XY pair separated by a comma and no spaces (e.g. 81212,12741). If running an aligned write, make sure global alignment marks are defined in the Exposure object in CJOB (they need to be defined here or the job won't be considered an aligned write).
Random/nonsensical errors when trying to execute a job Check for spaces and special characters (/, ~, &, *, etc) in your CJOB file, particularly in the object names. This can cause all kinds of seemingly-random weirdness. Also double-check that your command line arguments are all correct.
Job finds global alignment marks successfully, but then crashes immediately after The angular correction needed by the system exceeds its maximum of 0.2 degrees. Take the holder out and double-check the rotational adjustment in the alignment microscope. You should see less than 3.5 microns of translation in one axis per 1 mm of translation in the other. You may also have your alignment marks listed out of order; see “can’t calculate substrate” error above
Can’t reopen a .cjob file with CJOB There’s probably a space in one of your object names. Open the .cjob file as a text file by typing gedit <filename>, find the offending object name in the XML, and remove the space. It should work now. Alternately it may be easier to just recreate the job from scratch.
CJOB won’t display a newly-defined alignment mark in the list of available marks Close CJOB, run the command $pg save, and reopen it. You should be able to see the new mark definition now.
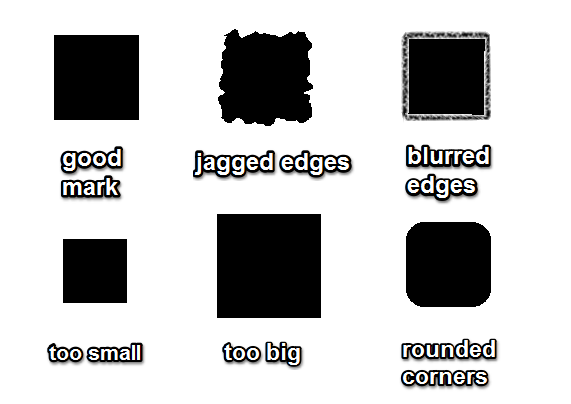
Write is crashing due to height-measurement errors at the beginning (asterisks in the 9-point height map) Make sure your starting coordinate(s) put you over your sample and that the pattern you're trying to write isn't larger than your sample area. If this is fine, previous patterning and/or roughness could be confusing the height meter. Open the job in CJOB, go into the Exposure object, and change the “Height” option from “check” to “none” to disable the initial height check (the height will still be checked in real-time during the write itself). If you're encountering this problem while writing on a transparent substrate, see the transparent substrate guide for solutions.
Errors when trying to locate calibration mark using pg move mark or mvm Rerun the command a few times; sometimes it doesn’t work on the first try if the beam current has just been switched.

If it still isn’t finding it, turn on the SEM and make sure you’re over the mark and it’s visible. If you aren’t, the wrong holder is probably selected. If you are, try switching to a lower beam current and running the command again.
Random issues with CSEM, CSYS, or pg commands, particularly lock-ups when executing commands. Restart the software. Open another terminal window (if necessary) and run the pg_restart script. Use the password “beamwriter” if prompted for one.
CSEM keeps coming up in “read-only” mode (no SEM or stage movement controls) Use the desktop icon or csem_restart command to kill all running CSEM processes and restart CSEM.
Buttons in CSEM aren't responding; error messages displayed in the bottom of the window Use the desktop icon or csem_restart command to kill all running CSEM processes and restart CSEM.


Loading/Unloading Errors

Error Condition

Alarm goes off in CSYS when the system tries to transfer a holder in or out of the system

Error Codes

Cause

The holder, load arm, cassette, and/or stage got jammed at some point during the load sequence and the vacuum system controller put everything into a hold state to avoid system damage. The most common cause of system jams are holders loaded into the cassette incorrectly but many other things can cause them too.

Resolution

This is a serious error with the potential to cause major damage to the system if not handled correctly.

The most important thing here is to not do anything. When the transfer system jams the vacuum controller will go into a hold state where nothing can move. This is a Good Thing. Pressing the Stop Buzzer button in CSYS once will silence the alarm; pressing it twice will clear the error condition and cause the system to try to resolve the issue. This is Not a Good Thing! The system generally can't recover from jams on its own, and depending on the type of jam may do anything from just re-raise the alarm condition to burn out the stage motors trying to get the stage back to where it should be.

Since it's impossible to tell how the system is jammed from the outside, treat all transfer jams as potentially catstrophic. Press the Stop Buzzer button in CSYS exactly one time and contact Bryan by phone (use the shell command ohno to get his contact info) if it isn't the middle of the night. If it is the middle of the night, send him an email explaining as much about what led to the problem as you know, turn on the red light on the operator desk, and mark the system down in Badger.

Under no circumstances should you do any of the following:

The most important takeaway here is that the system will be fine as long as the vacuum system stays in the hold state. As long as you don't disrupt that by clearing the alarm, it will keep until Bryan can take a look at it.


Gun Trip-Out Errors

Error Condition

System spits out error messages about the EHT or HotBox? tripping out when attempting to load a beam profile; no visible image in CSEM microscope mode.

Error Codes

Cause

Arcs in the gun chamber, power sags, ambient moisture, and vacuum failure can all cause the 100kV supply to trip out (go into emergency shut-off). Obviously the system is unusable in this state.

Resolution

The good news here is that if the system has tripped out there isn't really anything else bad that can happen. As a result trip-outs aren't an emergency, although the system going down for 8+ hours when you needed to use it is incredibly annoying.

Monitor software on the system will notify Bryan when the gun trips, but it can't hurt to give him a call (use the ohno command to get contact information) during normal hours or an email in the middle of the night. Mark the system down in Badger and turn on the red light by the operator desk, as the high-voltage supply needs to be reset and the gun needs to be run up and stabilized, a process that generally takes about 8 hours.


C2/FL Current Errors

Error Condition

The system gives errors related to the C2 (lens 2) and FL (final lens) currents when trying to load a beam profile or adjust the current in either lens.

Error Codes

Cause

This is usually caused by the system putting the C2 and/or FL lenses into emergency shutoff mode because of a temperature warning. This is usually caused by one of two things: a loose connection to the lens thermocouple or a power failure in the chiller cooling the lenses. The chillers shut off automatically when their water level is too low, which is the most likely reason for them to be off; refilling them will turn them back on automatically.

Resolution

The lens chillers live just inside chase 5, where the main snake of cables for the system leads. If the temperature monitors on top of the baths aren't displaying a temperature (19 or 20C) then the chiller(s) are off. Topping them up with distilled (NOT deionized! Deionized water will corrode the fittings in the system!) water will get them working again. Water can be poured directly into the port on top of each chiller (see right image); they can be filled to the top safely.

If no distilled water is handy near the chillers, a staff member should be able to help you find some. Please call Bryan or wait if you're not comfortable with any step of this; don't try to improvise!

IMG_20130911_134450.jpg refill_chiller.jpg

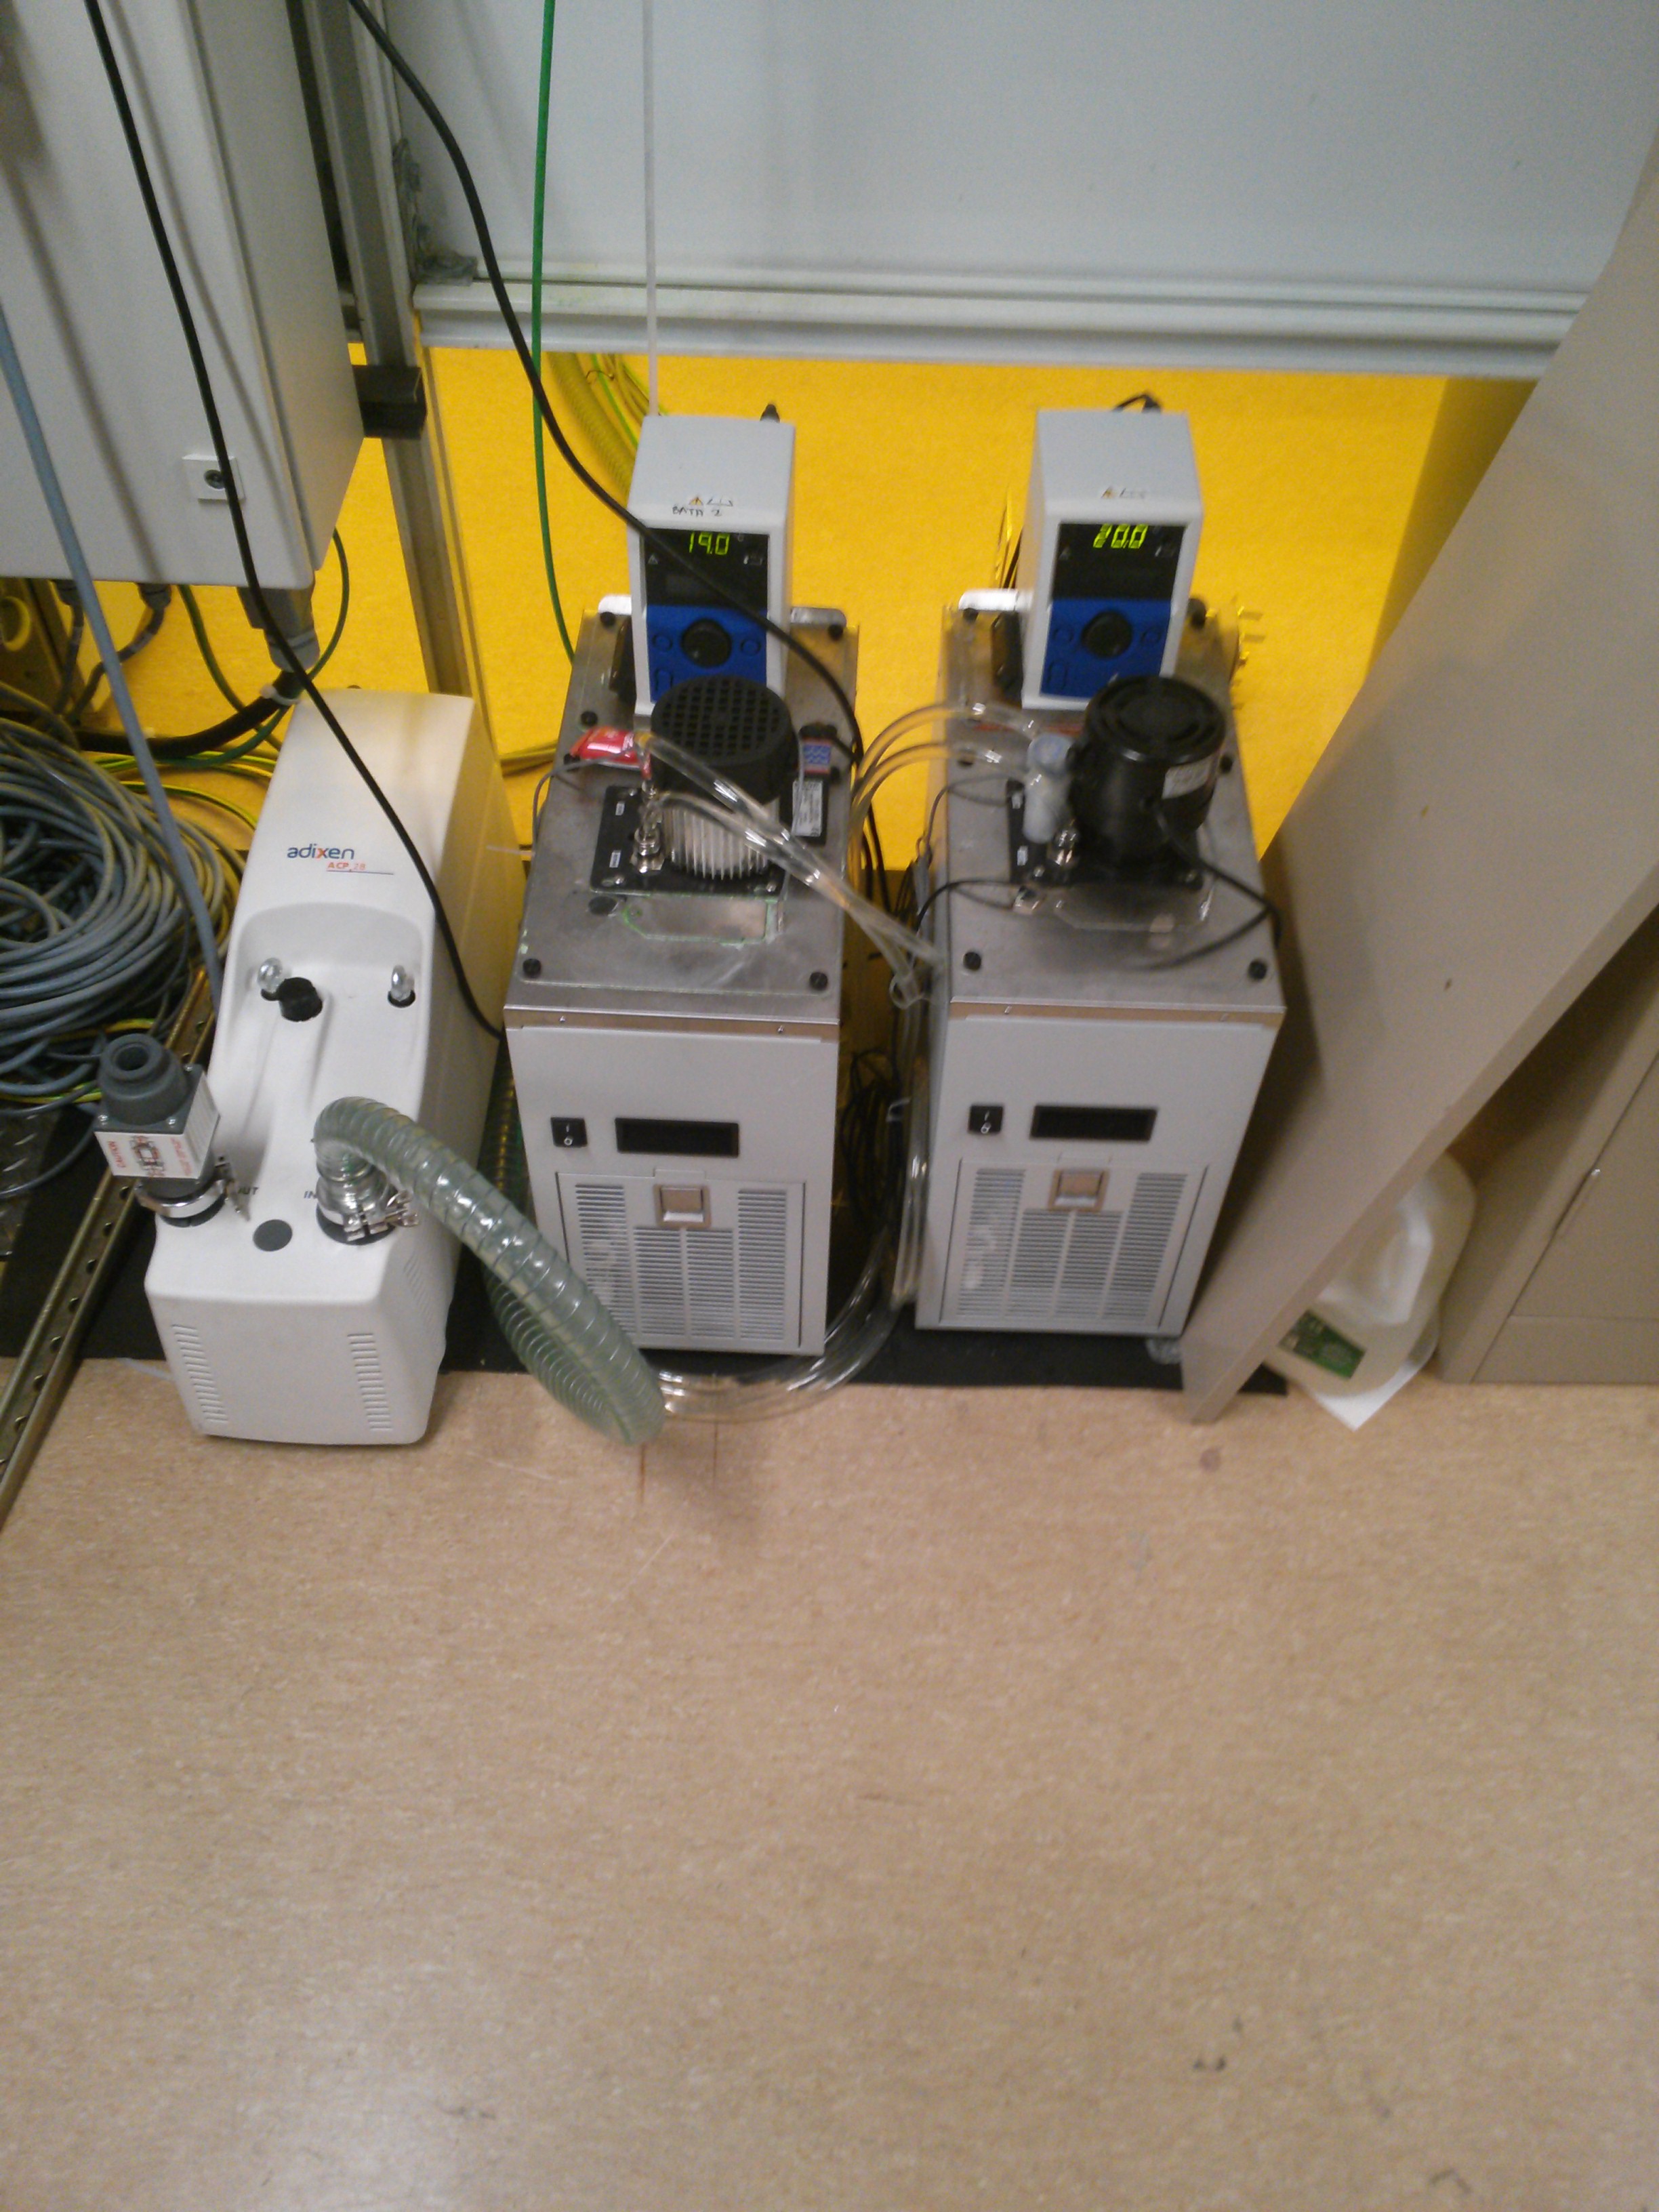
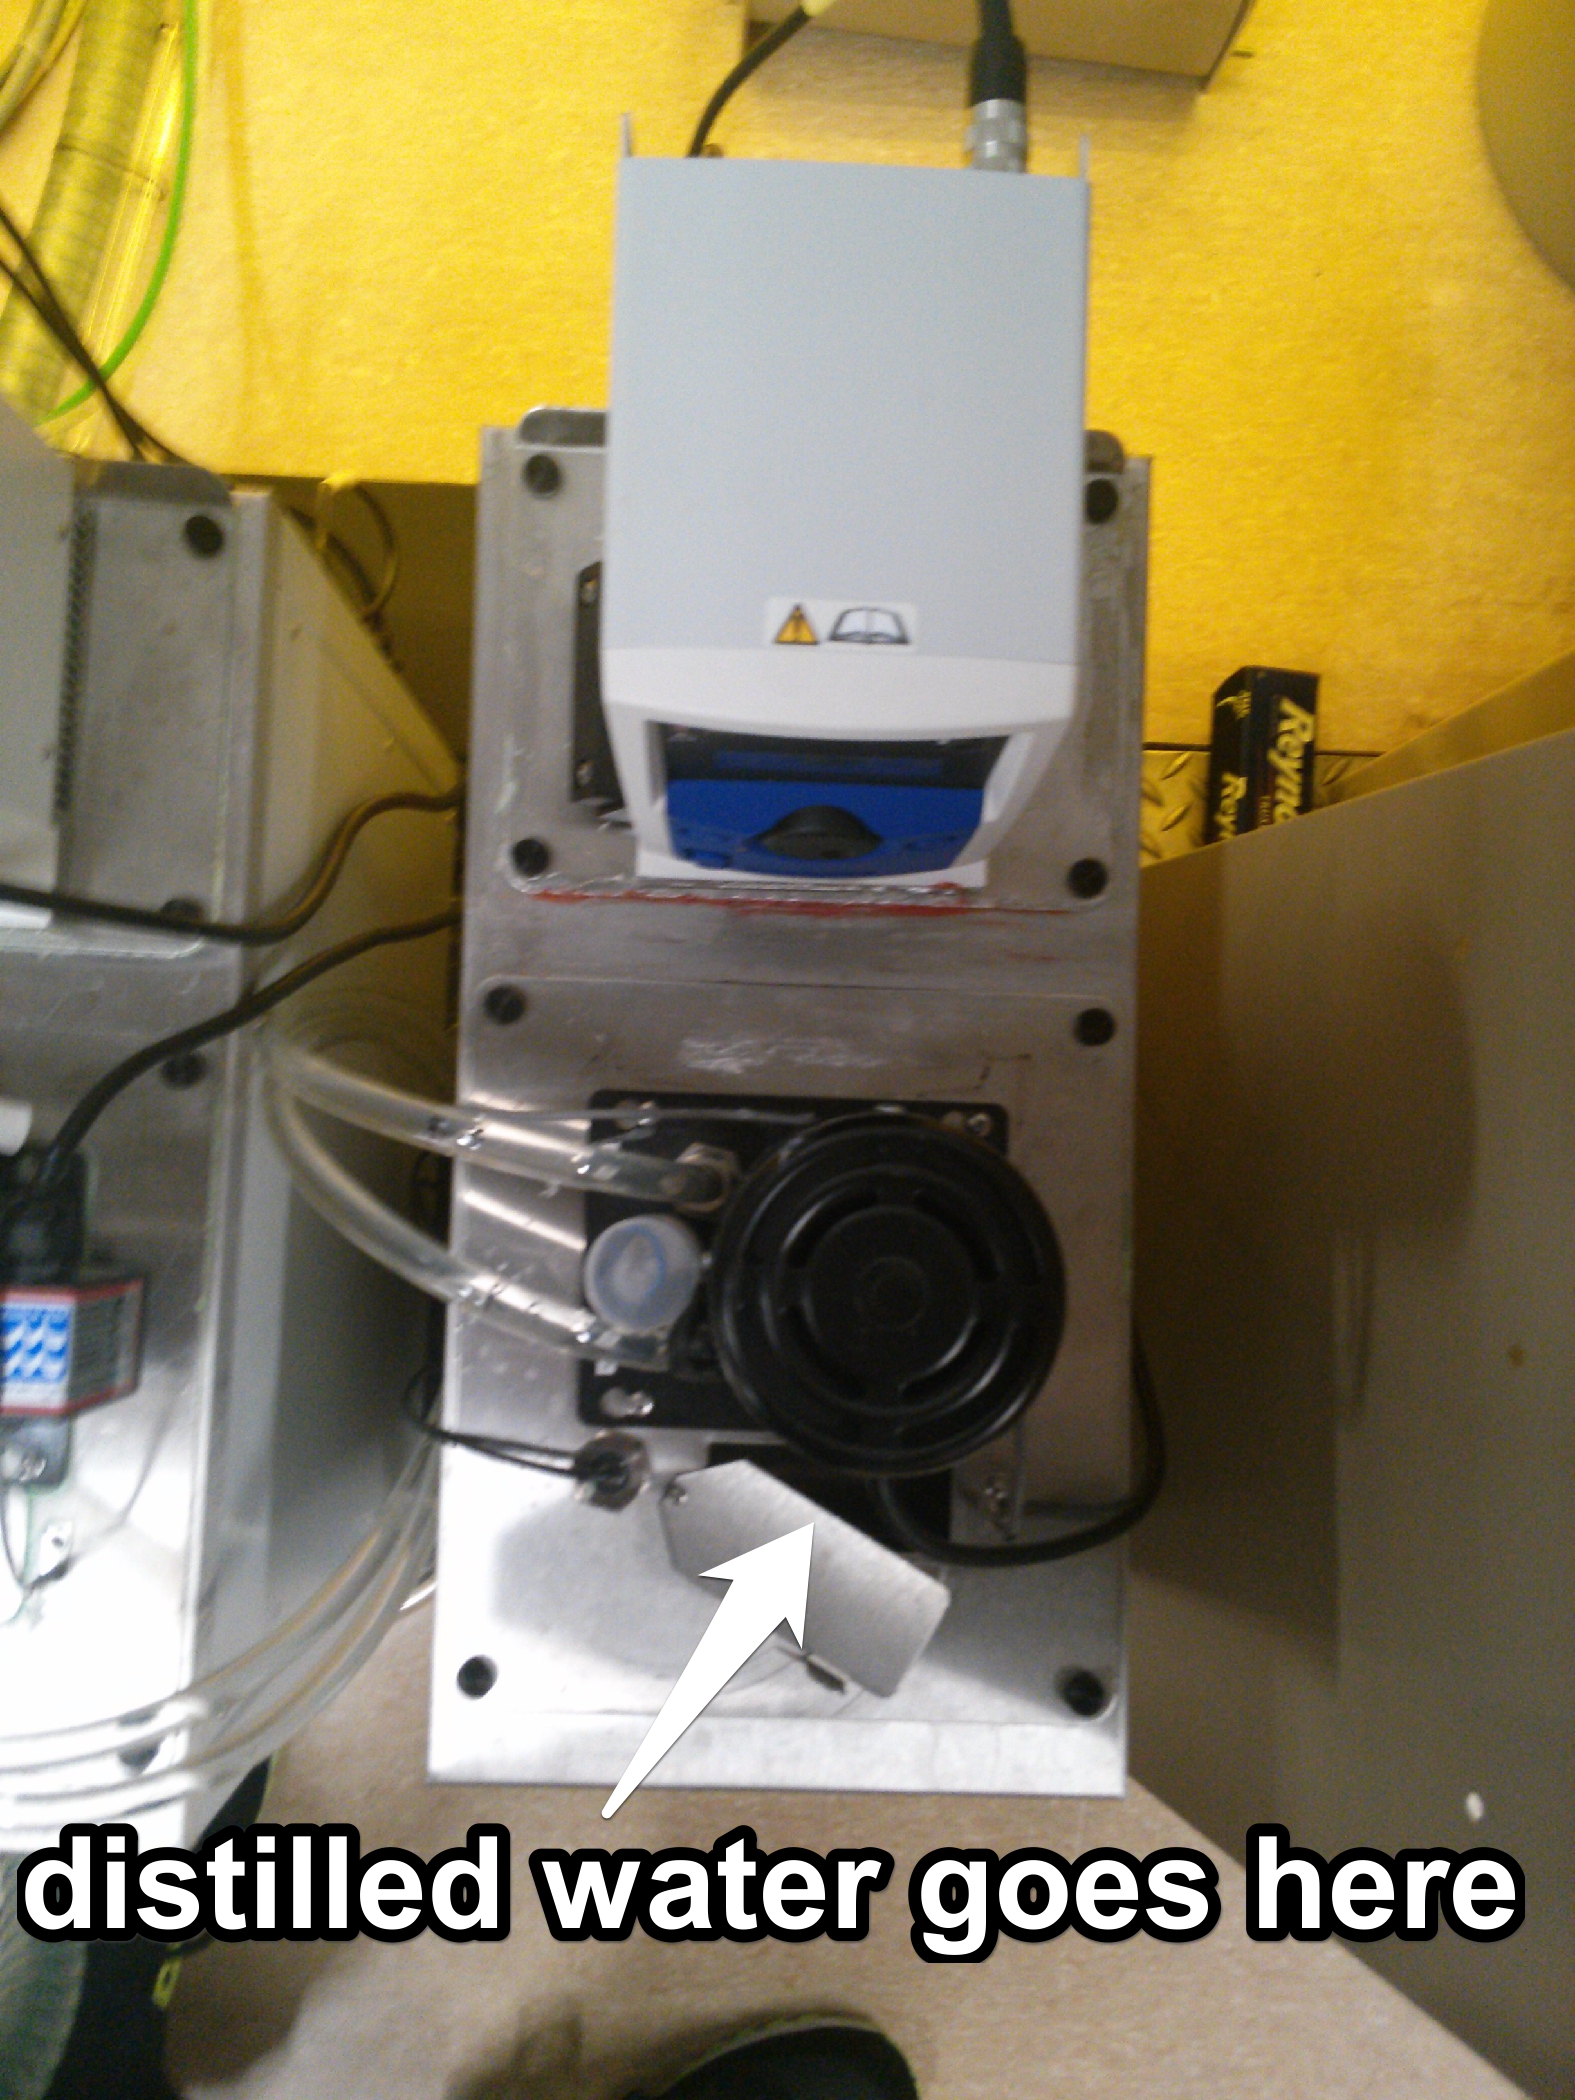
If you're still getting errors after refilling the chillers, (or the chillers look fine) it's probably the thermocouple cable. Get in touch with Bryan and he'll deal with it as soon as possible.


Alignment Mark Location Failure

Error Condition

The system fails to locate alignment marks on your sample using the automated routines ( pg move mark etc). Sometimes this can happen even when the mark is clearly visible in SEM view in CSEM.

Error Codes

Cause

Resoution

  1. Double-check that your mark coordinate is correct by driving to it using the pg move position (shortcuts are mvrl/mvab) command and switching to SEM mode. Your alignment mark should be approximately in the center of the field. If it is not, move the stage by double-clicking on the mark until it is centered and read the new coordinates from the lower-right corner of the CSEM window. Be sure to turn on the crosshairs in CSEM (the crosshair button on the left of the window), as they will make this process much easier.

  2. If you are using cross-shaped marks, you will need to center the mark, zoom in, center the mark again, and repeat until the beam is pointed at the center of the mark at a magnification of 1000-5000X. For rectangular marks, centering at 200-500X is usually fine.

    1. Once you’ve centered the mark, you can quickly test the mark locator at the new starting point by using the command findmark <markname> , which will try to find the mark <markname> at the current stage location. If it doesn’t return an error, jot down the stage coordinates as your new mark location. If you do get an error, go back to SEM mode and keep trying to center it. Crosses in particular are very sensitive to off-center starting positions, so some tweaking may be required.

    2. If no amount of center adjustment is helping locate the mark, and particularly if %ENG_E_NOIRED errors are appearing during the mark-location procedure, try turning up the beam current. A current of at least 5-10 nA is usually reliable for mark location; lower currents can leave the locator algorithm with a signal-to-noise ratio that’s too low to work with (usually indicated by %ENG_E_NOIRED errors). Once you’ve located the mark at the higher current, make sure you switch the current to whatever you’ll be using in your job and find it again!

  3. Make sure your marks are the correct size and shape. The system needs marks that are sized within 0.1 μm of the dimensions defined in the mark definition. Use the CSEM reticle to measure your mark; if it’s larger or smaller than you expected, create a new definition with the correct size and try using that to locate it.

    Misshapen marks are more problematic. Rounded corners and jagged edges will make mark detection difficult, if not impossible, with auto-alignment. If your marks are misshapen, try using either image alignment (see step 5) or manual alignment (see step 6). For some tips on creating good marks that the system can find, see the alignment mark best practices document.

  4. If your mark coordinates are correct, the mark is visible in the SEM and the correct shape/size, the current is turned up, and the system is still spitting out ENG_E_NOIRED error codes while trying to find the mark, the mark contrast may be too low for the locator algorithm to work. Modifying the algorithm’s threshold settings may help you work around this.

    1. The shortcut hicontrast <markname> will set contra to 99 and blvtol/mlvtol to 170 for the given mark. This will often solve contrast-related problems without the need to play around with individual parameters

    2. If the hicontrast shortcut doesn't help, you can try manually modifying the mark-finder parameters. The table below describes the ones you care about and suggests possible changes:

      contra Video contrast. change from 75 (default) to 99. Increase this if you get ECC_E_VICOBA errors.
      mlvtol Marker-level tolerance. Change from 40 (default) up to 200. Increase this one if you're seeing ECC_E_MMLEOT errors. Note that increasing this will improve the likelihood of finding your mark, but also decrease alignment precision, so don’t bring it up any higher than you have to.
      blvtol Black-level tolerance. Change from 40 (default) up to 200. Increase if you're getting ECC_E_MBLEOT error codes.The caveat for modifying mlvtol applies here too.
      eplmin Edge-positive video level measurement minimum. Reduce from 300 (default) to 200. This will decrease precision but increase noise-immunity.
      eplmax Edge-positive video level measurement maximum. Increase from 1000 (default) to 1020. See eplmin for details.
      israd Marker search radius. Decrease if mark-finding is taking too long, increase if marks are consistently falling outside the search radius (ECC_E_NOMARK errors). Values for israd are in microns.

    3. The command to modify marker-search parameters is pg marker set <markname> <parameter> <value>, where <markname> is the name of the mark definition you’re using, <parameter> is the setting you’re modifying, and <value> is the new value of that setting.

    4. To see the current value of all mark-imaging parameters for a given mark definition, use the command pg info marker <markname> /test=par or the shortcut marktable <markname>, where <markname> is the name of the mark definition.

    1. After modifying parameters for your mark, use the $pg save command to save the values before searching for the mark again.

      a. To reset the search values for a mark, use the command pg marker reset <markname> (or the shortcut resetcontrast <markname>). If you modify the values for a mark you didn’t create yourself, please reset them when you’re done.

  1. Image-based alignment is available on the system as an alternative to the standard alignment-mark-finding algorithms. See the Image-Based Alignment Tutorial for details on how to use this, as it is fairly complicated.

  2. If changing the mark-detection parameters still didn’t work, the solution of last resort is to locate the marks manually. To do this, change the name of all the offending marks in your job file to JOY (if the JOY mark is missing, create it with any set of parameters you want, they don’t matter). When the system tries to find a JOY mark, it will stop and prompt the user to continue instead of running the usual detection routine. When it stops, turn on the SEM and manually center the mark in the field by double-clicking. Once the mark is centered, go back to the terminal window and hit Enter to continue. The system will use the current stage position (which you centered on the mark with the SEM) as the mark location and continue.

    1. There is a bug in CSEM that must be accounted for when using the JOY mark. Essentially, the center of the SEM-view window isn’t the true field center. You can correct this by doing a pg move mark command to center the field on the calibration mark, switching to SEM mode in CSEM, clicking “calibrate center,” and dragging the crosshair so it’s centered on the calibration mark. Alternately, running the joyplus command before starting your write will automatically apply the same correction.

    2. If you have a lot of marks in your job, you’ll have to do this each time the system tries to find one. Plan on sitting there for the length of the job if forced to go this route.

    3. Alignment with the JOY mark is substantially less accurate than the automated alignment. Depending on how good your eyes are, expect to get 100-500 nm overlay accuracy at best. Again, it’s a last-resort solution when the alternative is being unable to do the write at all.

  3. A good way to quickly check whether the system can locate a mark is to move the SEM so the beam is directly over your mark and use the command pg move marker 0,0 <markname> --rel (shortcut: findmark <markname>). If it finds the mark, it will return to the prompt without an error; otherwise you’ll see the usual error codes.