Quickstart


Step 1: Create a CAD pattern in GDS, CIF, or DXF format

Software: CleWin, LayoutEditor?, L-Edit, etc.

This can be done on your own computer or while logged into the CAD machine via VNC (see below). Any CAD package that saves GDS, CIF, or DXF files will work. For local editing, CleWin is available for Windows machines; for server-side work, CleWin? and LayoutEditor? are available from a VNC terminal.


Step 2: Move your GDS file to the CAD server

Software: FileZilla, any other SFTP client

This is only necessary if you created your pattern on your own computer; if you used LayoutEditor? on the CAD server, you can skip this step.

The CAD server can be accessed via SFTP at the address ebpg.mnc.umn.edu, port 2222 (NOT the default port of 22!).

To make life simpler, make sure your pattern is in the /gds subdirectory of your home directory on the CAD server, as this is where LayoutBEAMER? will look for it first.


Step 3: Fracture your pattern with LayoutBEAMER? on the CAD server

Software: PuTTY, VNC, LayoutBEAMER?

Log into your VNC console on the CAD server. To do this, you’ll need to first connect to the server using SSH and start your console. Direct PuTTY? or the SSH client of your choice to ebpg.mnc.umn.edu, port 2222 and log in with your username/password. After logging in, type the command crank to start your desktop. Leave the SSH window open; closing it will kill your desktop.

Now log into your VNC desktop by connecting your VNC client to ebpg.mnc.umn.edu:XX, where XX is the unique desktop ID you received when your account was created. If you don’t remember it, typing showvnc in the SSH window will display your desktop ID.

Once logged into VNC, start LayoutBEAMER? using the desktop menu (right-click to bring it up) or by typing beamer or lb at any terminal prompt. Only one person can be using Beamer at any given time, so if someone’s on it the software will ask you to wait or call them to see if they’re done. Otherwise, the first time you use it the system will prompt you for your name and phone number so other people can do the same when you’re on it. Please be considerate and enter your correct name/number. If you need to re-enter your contact info for any reason, simply edit or delete the beamer_contact file in your home directory.

LayoutBEAMER? can do a lot of things, but in this simplest case we’re only going to consider two of them

First, drag the “Import” box on the left into the work area at the right and select the GDS/CIF file you want to import (the one you uploaded in the last step) and which layer(s) of it you want to use.

Next, Drag the “Export” box over the bottom of the Import box you already added until the mouse cursor changes and a black dot appears under the Import box.

In the first dialog that pops up when you drop the Export module, choose the output name and path. By default, output files have the .gpf extension (EBPG-readable patterns) and go in the /patterns subdirectory of your home directory

Once you pick the filename, a box full of options will appear. Choose “UMN EBPG5000+ 20bit 50MHz 100kV” as the Format Type (this should be selected by default). The Writing Grid contains the Resolution and Beam Step Size parameters. Resolution is the grid-snap resolution used to fracture your pattern, and should generally be set to 0.5 or 1 nm. Beam Step Size is the diameter of the pixels your shapes will be fractured into and can be any integer multiple of the Resolution. In general, it’s a good idea to use a step size smaller than your smallest feature; 10 nm is the default, but it can be set as low as 0.5 nm.

The “Advanced” and “Tool” settings aren’t typically things you need to mess with. In the “Extent” tab, you can choose how wide the pattern area is (it defaults to the minimum possible size). This can be useful if you have two different-sized patterns that you want to overlap; you can give them both the same extent as the larger one.

Once everything is set the way you want, hit OK to save your GPF file.


Step 4: Set up a job for your pattern

Software: CJOB

Use the “Cjob” menu item or type cjob at a prompt to bring up CJob on the EBPG computer. The specifics of using CJOB are beyond the scope of this tutorial, but a basic layout works like this:

Start with a Substrate object by drag/dropping it into the work area. When prompted, choose the type of substrate (mask plate, wafer, etc) you’re using and give it a name. If your substrate is a piece part, use the arbitrary-dimension mask plate setting and put in the approximate size of your part. DO NOT USE SPACES IN THE SUBSTRATE NAME OR ANY OTHER NAME IN CJOB!!! Drag an Exposure object under the Substrate object until the mouse cursor changes, then drop it. For a non-aligned write, you just need to give the exposure a name; otherwise you’d also enter global alignment mark locations here.

Drag a Pattern object under the Exposure object. Select your GPF file and set the dose (the step size is read out of the GPF file header). Note that the GPF file needs to reside in the /patterns subdirectory of your home directory for CJob to find it correctly

Next, select a beam current from the list of available beam files. The beam filenames follow the convention current_aperture.beam_100 (e.g. 100na_300um.beam_100). In general, the 300 μm aperture is always used on the system, so pick a beam with the 300 μm aperture

The system will calculate the DAC frequency in MHz based on the step size, dose, and beam current. If the frequency comes out to over 50 MHz you’ll need to lower it, either by increasing the dose or decreasing the beam current.

Hit “OK” until you get back to the main screen. In the File menu, choose “Export Job.” There will be a list of .job files that are in your jobs directory and under that a list of all the exposure-level objects in the hierarchy (in this case, just the one). Select the Exposure object you want to export, give the .job file a name different from the default if you want, and hit OK. When you’re done exporting, hit “Done.”

If you want to save the hierarchy you’ve set up to edit later, go to “Save Job” in the File menu. This will save a file with a .cjob extension. These files cannot be executed on the EBPG, but contain hierarchies that can be loaded in CJOB using the File/Open command.

If you want to do more complicated layouts (alignment marks, dose arrays, etc.), see the CJOB tutorial. This is just a simplest-case example.


Step 5: Load your sample in a holder, locate the site you want to write at, load the holder into the system, and execute the .job file you created.

See the EBPG SOP for detailed instructions on how to do this.


Flow Chart

workflow.png
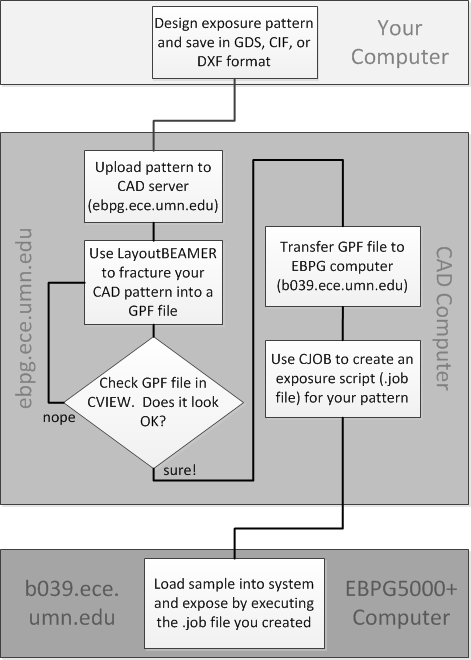
Block diagram of the basic workflow used to expose a pattern on the EBPG, including which steps occur on which computer.